
NetSuite Connection
Bitwave NetSuite Integration
v1.2

Step 1: Enable Token-Based Authentication
Enable Token-Based Authentication (TBA) in NetSuite for secure API access.
- In NetSuite, navigate to Setup → Company → Enable Features → SuiteCloud tab
- Find the Token-Based Authentication option
- Check the box to enable this feature
- Save the changes

Step 2: Create an Integration Record
Create a new integration record in NetSuite for Bitwave and collect the Consumer Key and Consumer Secret.
- In NetSuite, navigate to Setup → Integrations → Manage Integrations → New
- Create a new integration record named "Bitwave Integration"
- Check - Token-based Authentication
- Check - TBA Issuetoken Endpoint
- UNcheck - TBA Authorization Flow
- UNcheck - Authorization Code Grant
- Save the record and copy the Consumer Key and Consumer Secret.


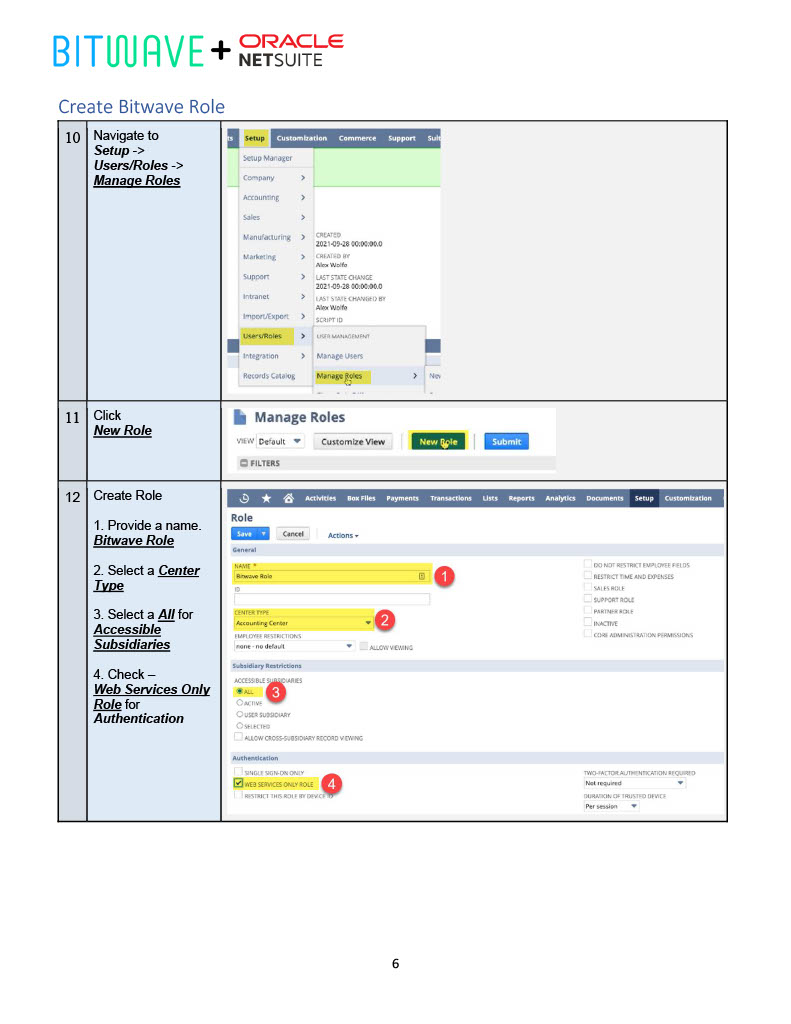
Step 3: Create Bitwave Role
Create a new role in NetSuite specifically for the Bitwave integration.
- In NetSuite, navigate to Setup → Users/Roles → Manage Roles → New
- Create a new role named "Bitwave Role"
- Select a Center Type and set Accessible Subsidiaries to All
- Check Web Services Only
- Set/create transaction permissions FULL: (Cash Sale, Cash Sale Refund, Check, Customer Payments, Deposit,Invoice, Pay Bills, Transfer Funds)
- Set/create list permissions VIEW: (Accounts, Locations, Bank Account Registers, Classes, Contacts, Currency, Customers, Vendors)
- Set/create setup permissions FULL: (SOAP Web Services, User Access Tokens)
- Save the role

Step 4: Assign Bitwave Role to User
Assign the newly created Bitwave Role to a user in NetSuite.
- In NetSuite, navigate to Setup → Users/Roles → Manage Users
- Find the user you wish to issue a Bitwave token for
- Click Edit on the user profile
- Click the Access tab
- Select the Bitwave Role created in the previous step
- Save the changes


Step 5: Create Access Token
Create a new access token for the user and integration in NetSuite and collect the Token Key and Token Secret.
- In NetSuite, navigate to Setup → Users/Roles → Access Tokens → New Access Token
- Select Application Name → Bitwave Integration
- Select User → User from Step 4
- Select Role → Role from Step 3
- Save and Copy the Token ID and Token Secret.


**Step 6: NetSuite Account
Enter your NetSuite Account ID from Company Information.
- Navigate to Setup → Company → Company Information
- Record the Account ID.

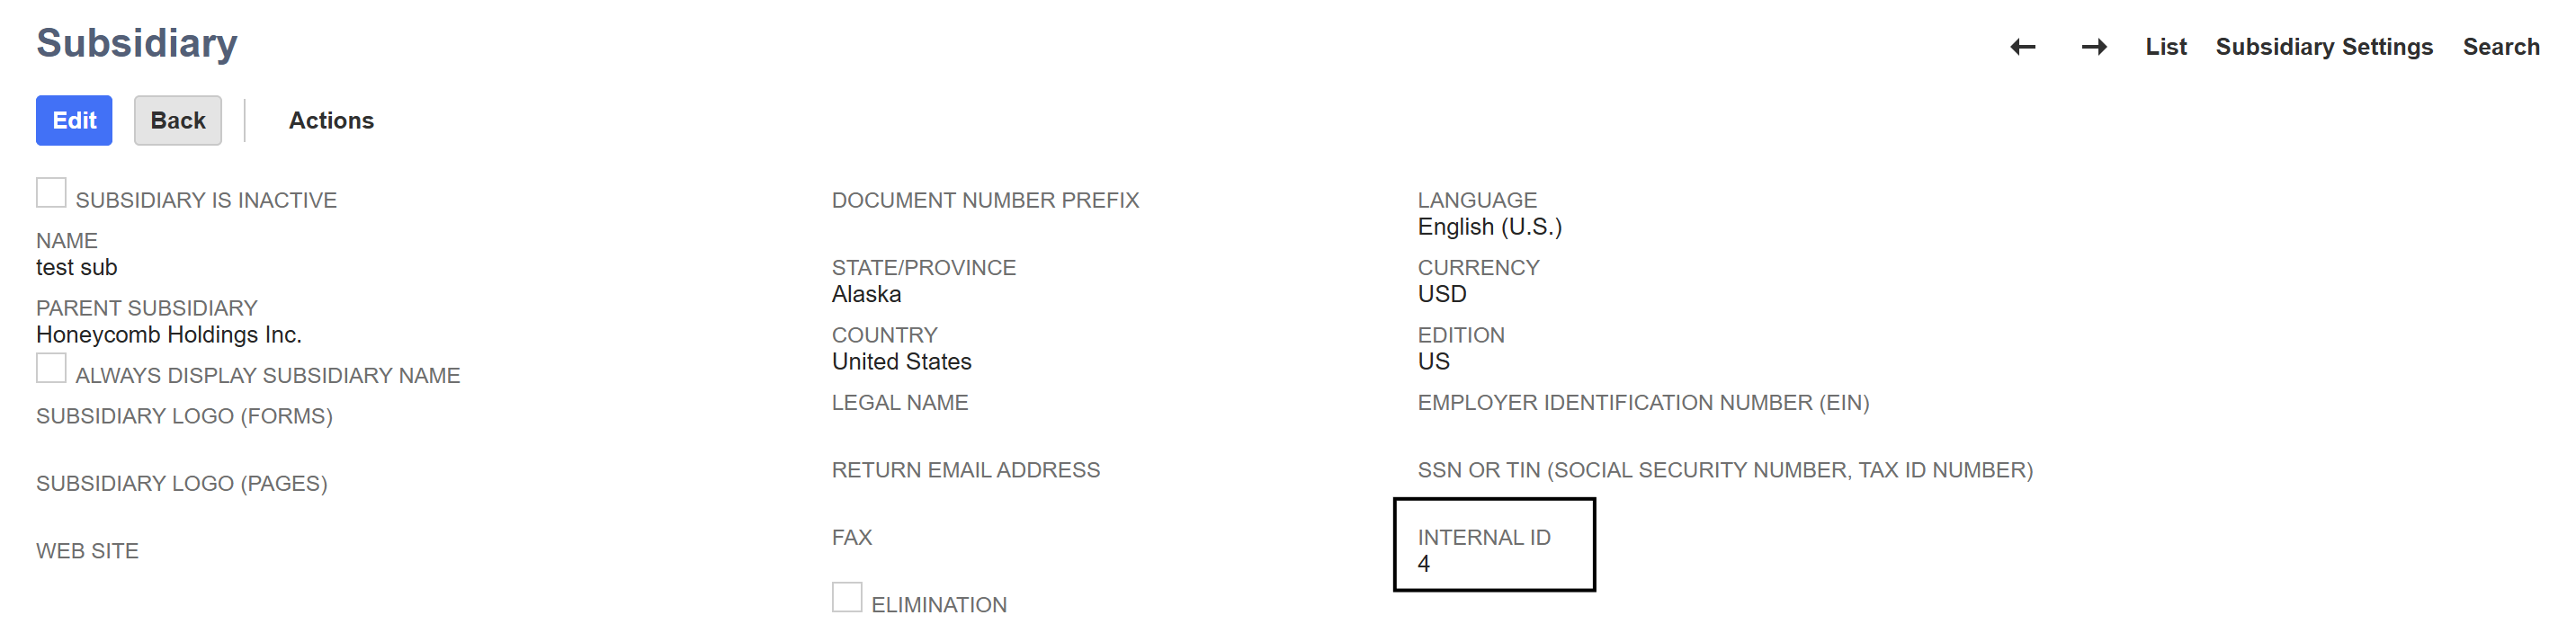
Step 7: Subsidiary Internal ID
Enter the Internal ID of the subsidiary you selected.
- Search for Subsidiaries in NetSuite
- Locate the Subsidiaries you selected when creating accounts
- Record the Internal ID and enter it below
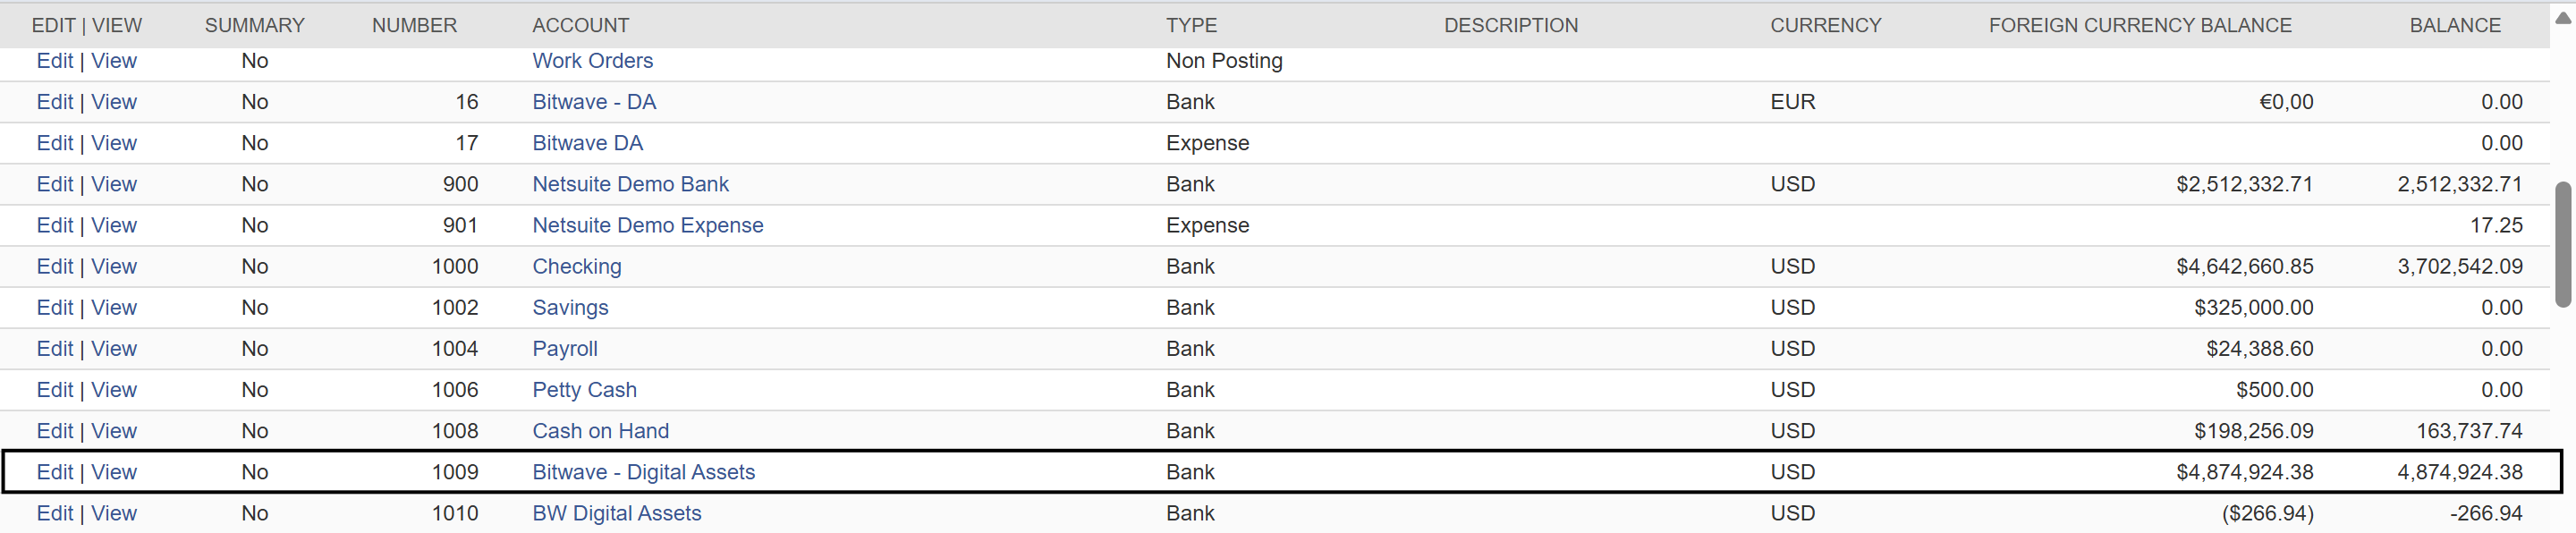
Step 8: Digital Asset Account Code
Enter the account code for your Digital Asset account.
- Navigate to Setup → Company → Chart of Accounts
- Find the Bitwave - Digital Assets account you created
- Record the Number (account code) and enter it below
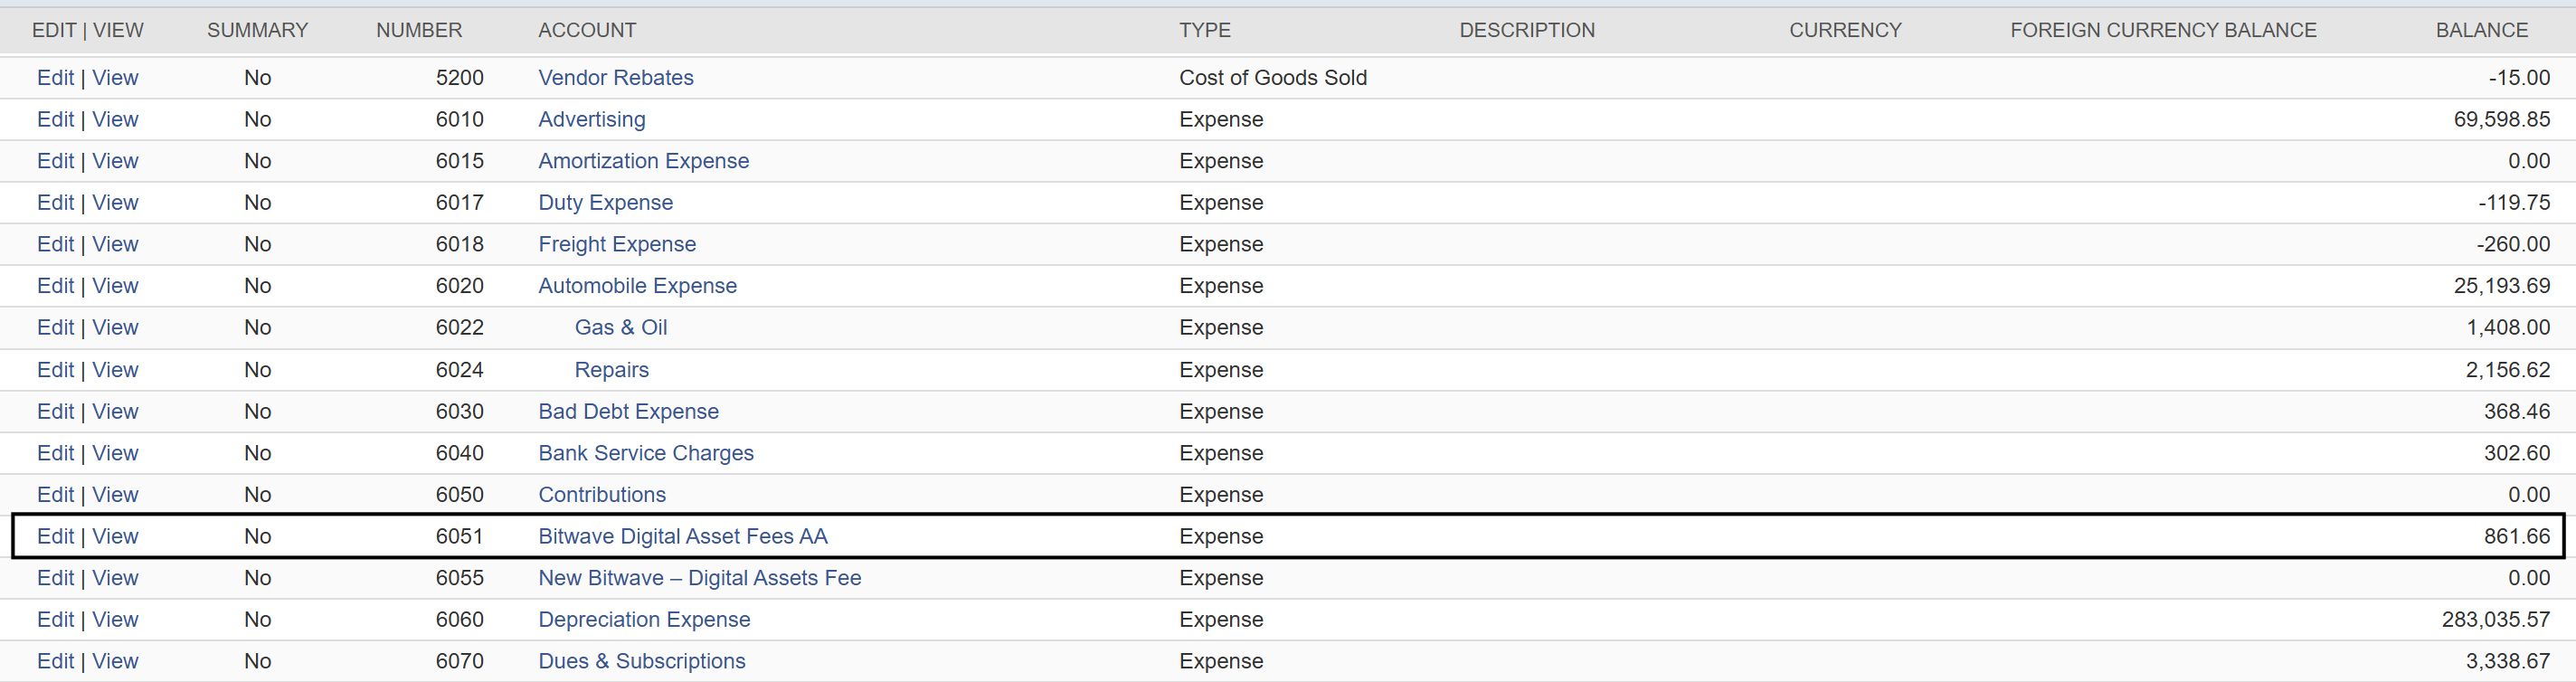
Step 9: Fee Account Code
Enter the account code for your Fee account.
- Navigate to Setup → Company → Chart of Accounts
- Find the Bitwave - Digital Asset Fees account you created
- Record the Number (account code)
Step 10 : NETSUITE SETUP FOR AR/AP
Within Netsuite In order to perform AR and AP from bitwave to netsuite
- Bitwave AR Clearing Account of TYPE BANK is required to be setup
- Bitwave AP Clearing Account of TYPE BANK is required to be setup
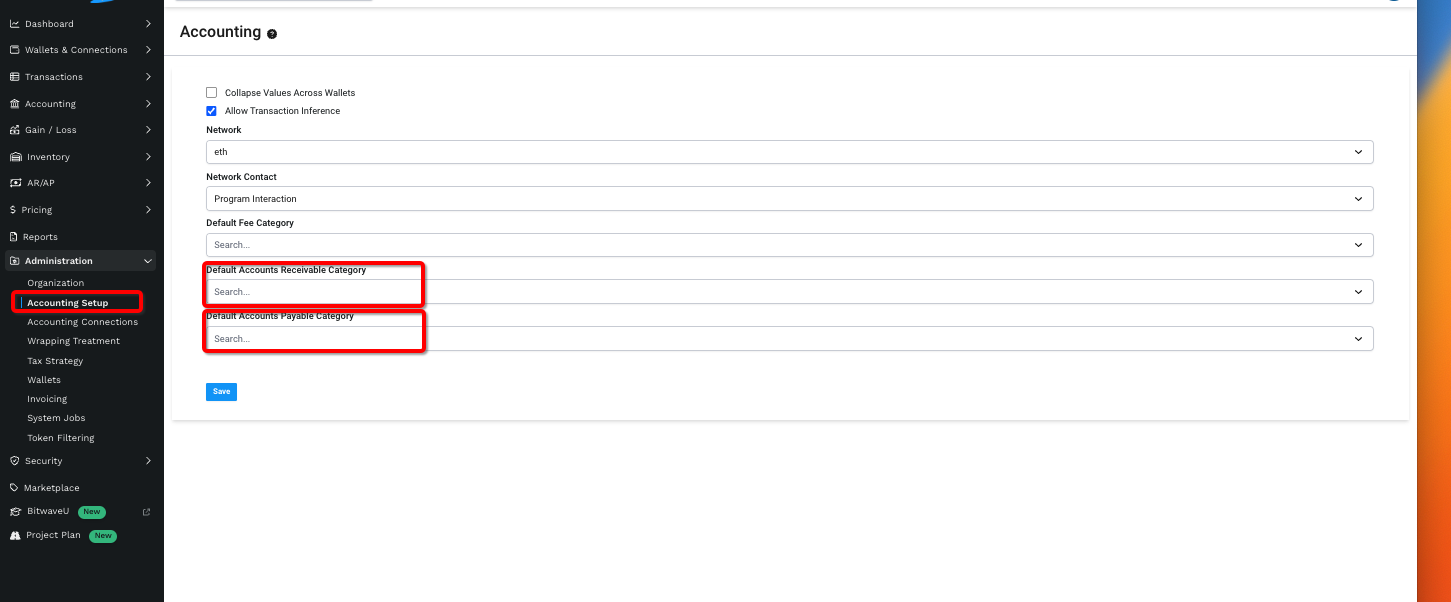
Step 11 : BITWAVE SETUP FOR AR/AP
Proceed to Administration -> Accounting Setup
- Choose the AR clearing Account identified above as your Default Account Receivable Category
- Choose the AP Clearing Account identified above as your Default Account Payable Category
Updated 6 months ago