
Set Up Categorization Rules
Rules are a categorisation function allowing users to mass categorise transactions based on
various parameters. Rules can be created to categorise inbound/outbound, internal transfers,
trades and DeFi transactions. The guide below outlines the steps to create different types of
rules.
Important reminder!
- Rules categorise historical data and will continue to run until disabled.
- Always test rules first before applying. This means you should use the date range fields
to narrow down the date in which the rules will run. Double check the tnxs and ensure
they have been categorised the way you expect before removing the date range. You
can also paste the tnx hash from the bitwave transaction UI into the field at the bottom of
the rule create page to validate that the rule will capture it.- Rules run automatically every 12 hours while enabled. You can run them manually in the
UI (actions→run).- Use a consistent naming convention for rules so that you and/or others are able to more
effectively review at a later date.
Setting up Rules
Required Fields
- Rule Name - does not affect categorisation.
- Priority - this determines in what order your rules will run.
- Accounting Connection - determines which categories and contacts the rule will use.
- Category type - the category you would like the tnx to be categorised to.
- Customer/vendor - the contact you would the tnx to use.
- Fee Category - the category you would like the fee portion of the transaction to be categorised to.
- Fee contact - the contact you would like the fee portion to use.
- Direction - the direction of the flow of funds in the tnx (outbound/inbound/all/empty).
Optional Fields
- Wallet - the wallet where the rule will be applied.
- Coin - If the tnx only contains this token, the rule will be applied to it.
- Method ID - You can find the method ID for a transaction by checking the tnx on the block
explorer. They typically look like this: MethodID: 0xe8e33700. More information about method
IDs can be found here: https://info.etherscan.com/what-is-method-id/ - Add Comparison - run a rule based on the asset amount.
- Use identifiers - run a rule if the tnx contains a specific token.
- From/to addresses - run a rule specifying the from and/or to address. This refers to the same
from and to addresses as you would see in a tnx on a block explorer. - Date from/to - run a rule from/to/between specified dates.
- Description - include a description to the description line in the tnx.
Most Commonly Used Rules
1. Gas Fee Only Rule
In the Bitwave transaction UI, you will notice transactions are marked with a symbol denoting
the transaction type. For gas fee only (e.g. smart contract execution), the symbol is </> and
these tend to be booked to the same category and contact. This is a perfect instance to use
rules to categorise all gas fee only transactions.
The image below show the configuration of the rule.
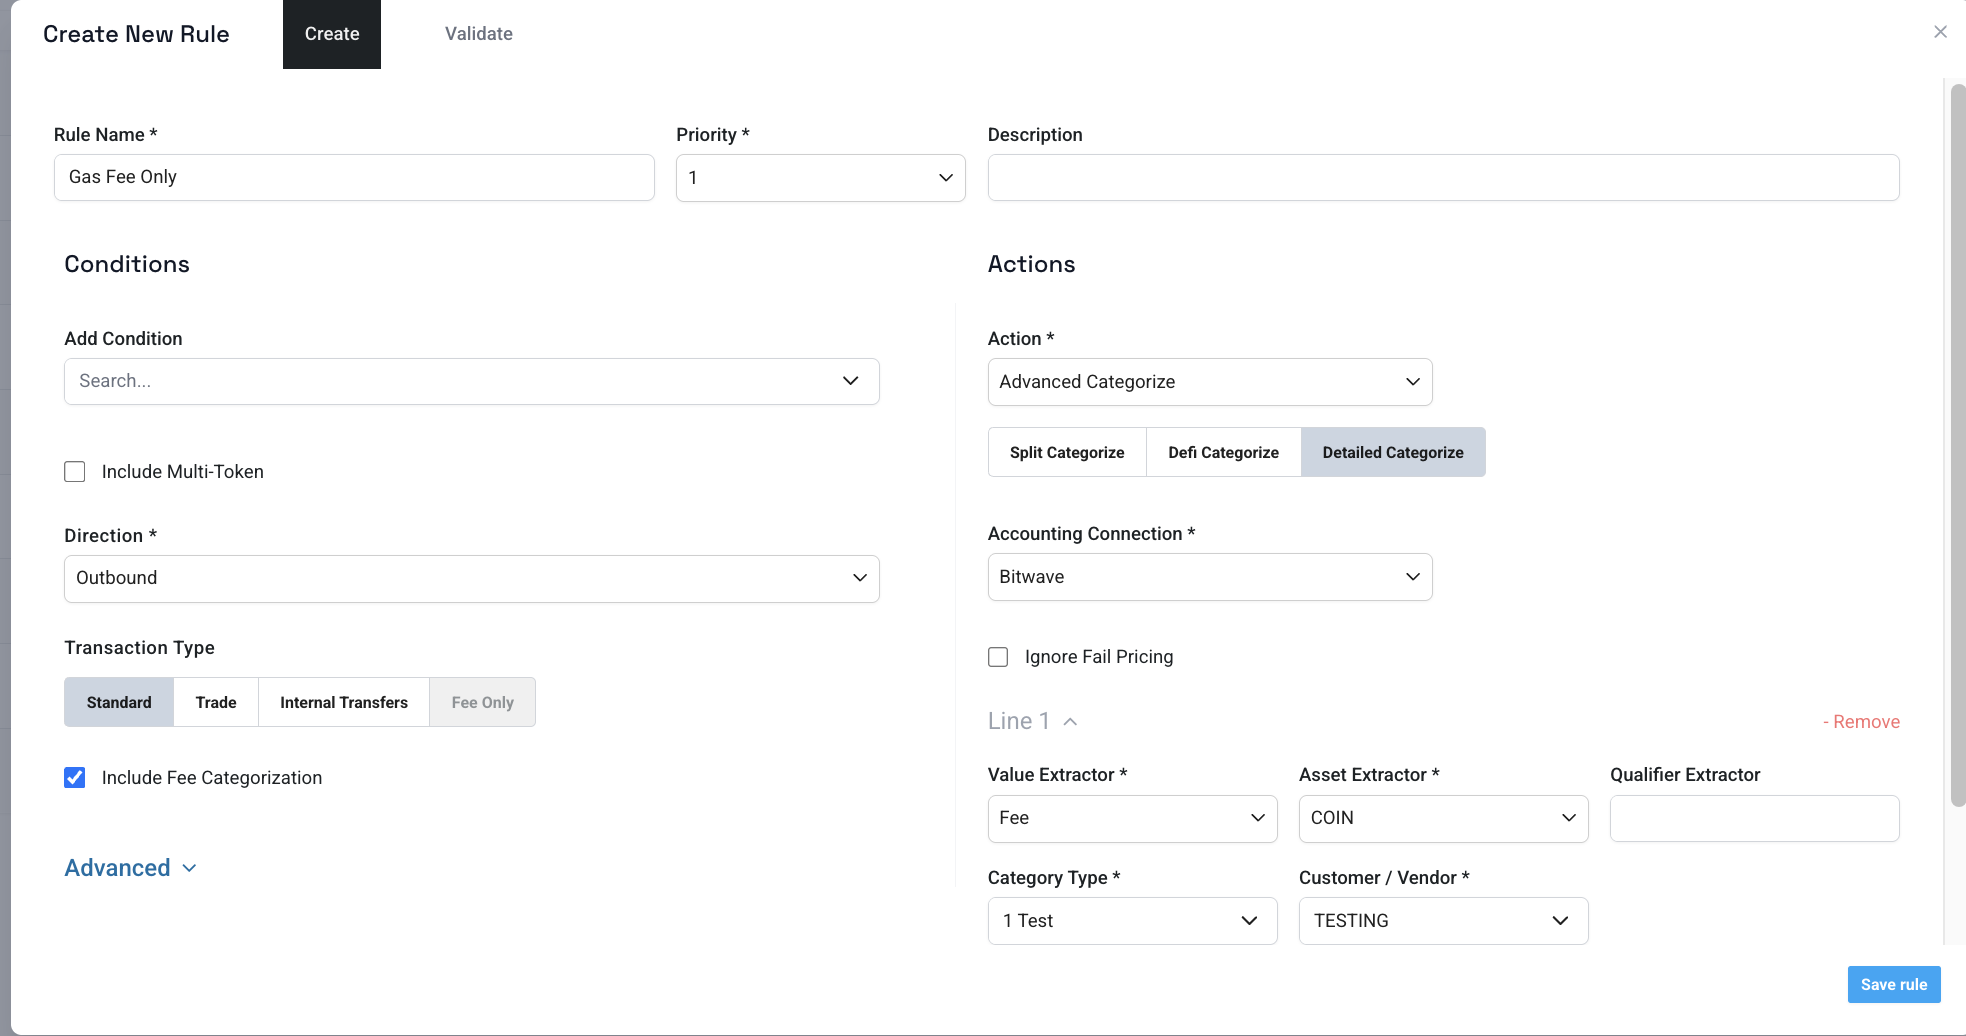
- No specific wallet has been selected. If you want to categorise gas fees differently in
each wallet, you would need to create a rule like this for each wallet.
2. Internal Transfers Rule (wallet-to-wallet transfers)
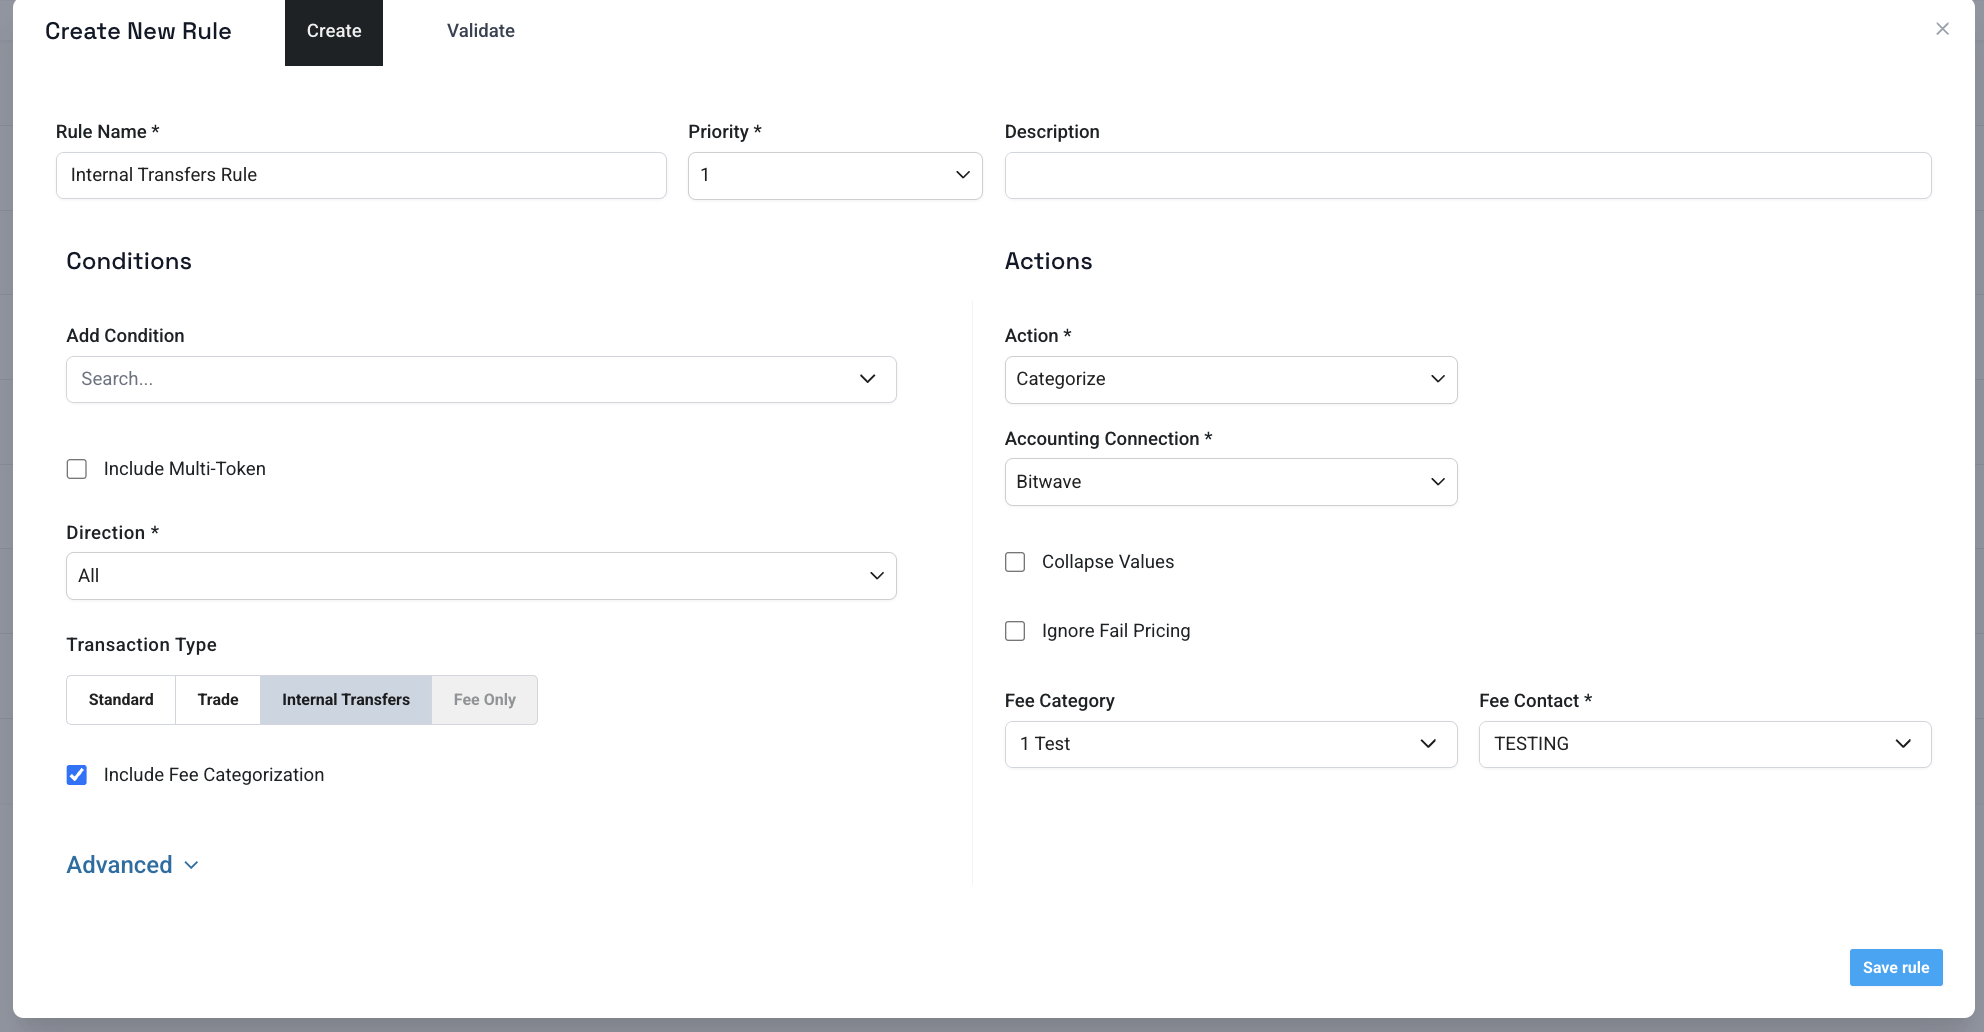
- Categorise fee should be selected. Most wallet to wallet transfers have a gas fee
associated with it. - If transactions involve more than 1 token being transferred, Handle multi-token must be
selected.
3. Trade Transactions Rule

- Handle multi-token selected. All trades in Bitwave are a swap from 1 token to 1 more or
more other tokens.
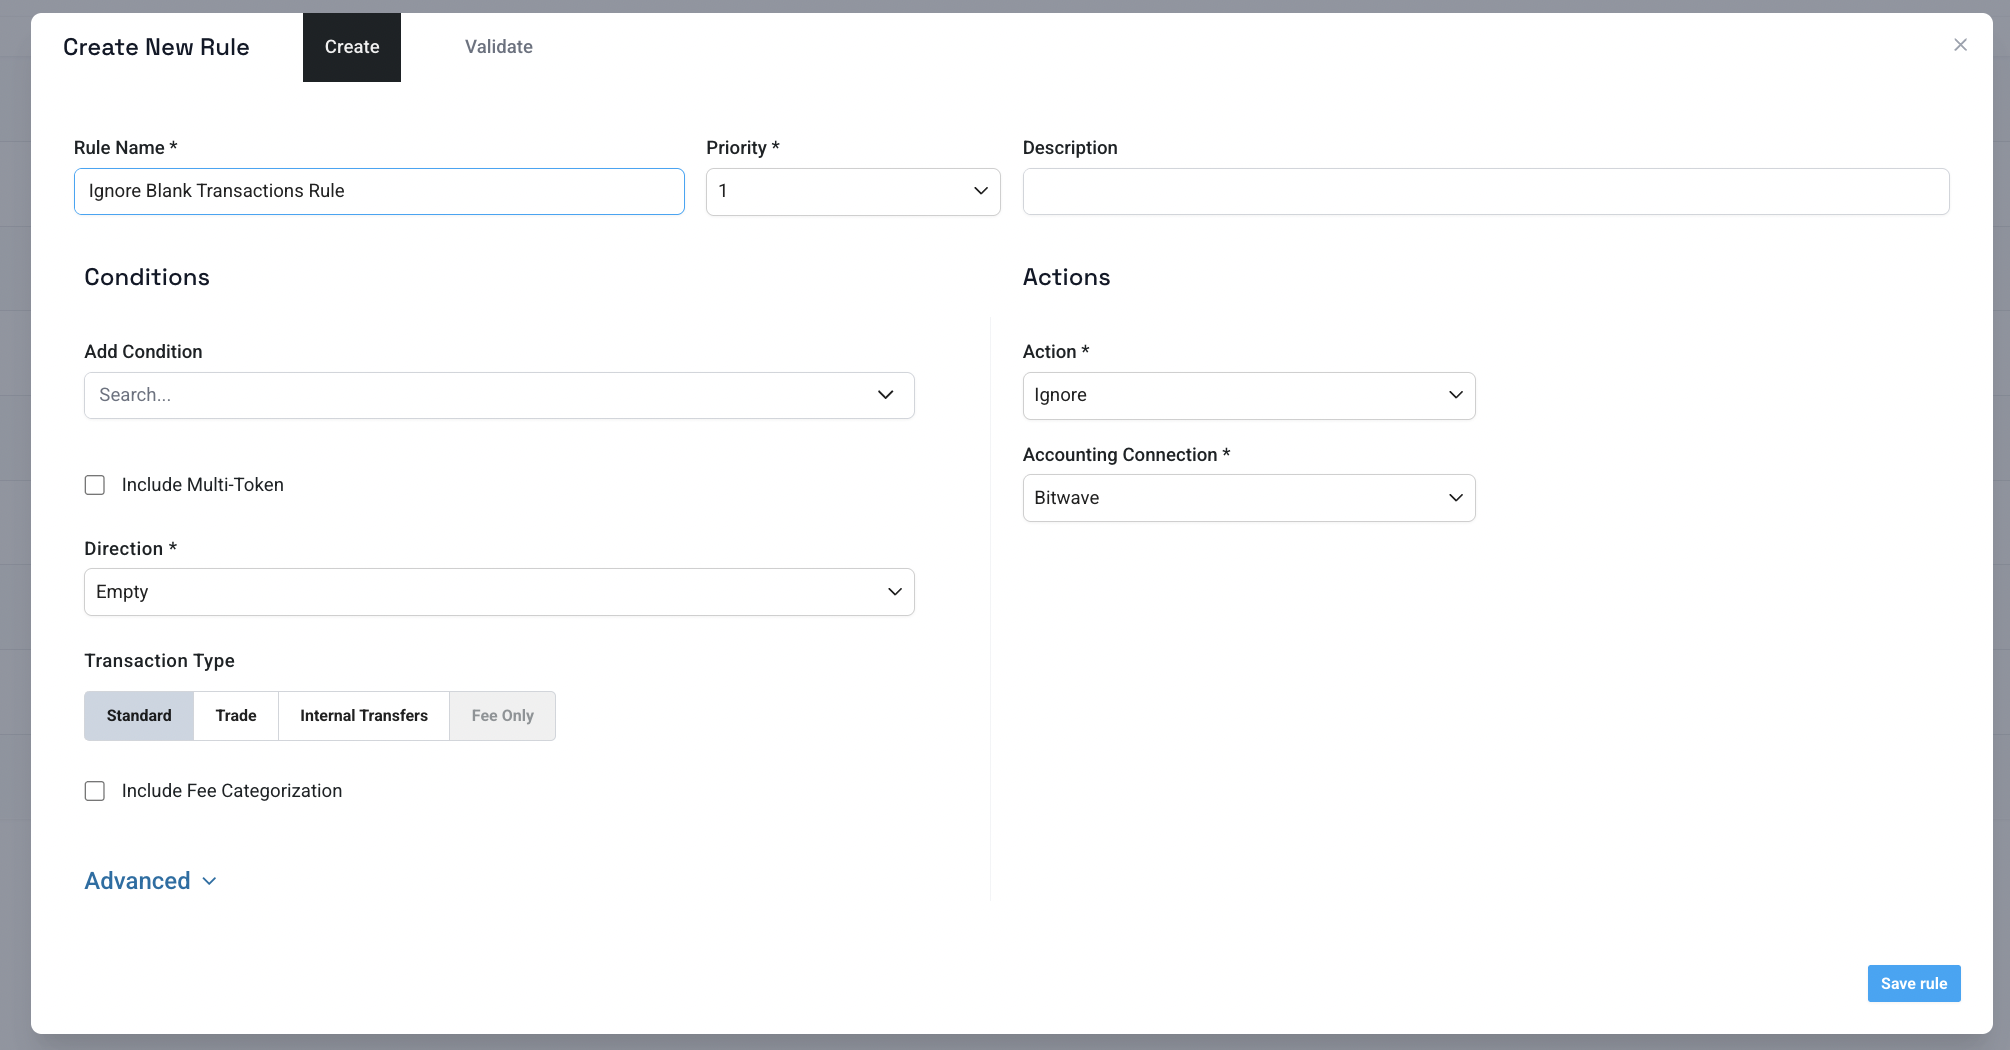
4. Ignore Blank Transactions Rule
Because Bitwave pulls in all activity, including transactions where the user is signing a
transaction and no funds are being transferred, you may see ‘blank’ transactions appear in the
Bitwave UI. A simple rule to ignore these will clear these out.
5. Simple Categorization Rules
Simple categorisation refers to categorising a transaction using a single contact. This would
have the same effect as categorising a transaction as standard in the transaction UI. We
typically use this rule type to categorise outflows and inflows. The image below displays a
transaction categorised using a ‘simple categorisation’ rule.
Creating a ‘simple categorisation’ rule.
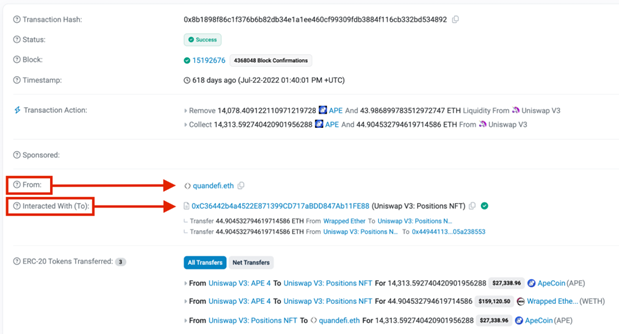
Using the same example transaction as shown above
(https://etherscan.io/tx/0x8b1898f86c1f376b6b82db34e1a1ee460cf99309fdb3884f116cb332bd5
34892), let’s say you only wanted to categorise this and all other outbound transactions where
the primary ‘to’ address is: 0xC36442b4a4522E871399CD717aBDD847Ab11FE88. You can see
which addresses are considered primary ‘from’ and ‘to’ in the image below.
In this case, the only change we would need to make to the previous rule would be to add
0xC36442b4a4522E871399CD717aBDD847Ab11FE88 into the ‘to (address)’ field.
Note: this rule will not look at the ERC-20 Tokens Transferred lines. That will be covered in the
‘Detailed Categorisation’ Rules section.
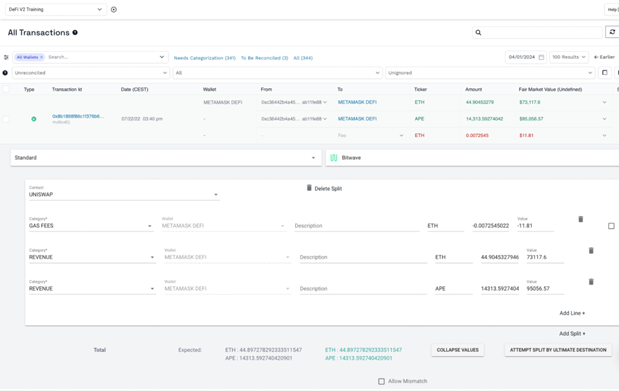
6. Detailed Categorization Rules
Detailed categorisation refers to identifying specific details of a group of transactions and using
this information to categorise. This can include:
- Contract execution transaction type
- Token ‘from’ and ‘to’ addresses
It also allows you to split out a transaction with multiple lines and categorise them to different
contacts and categories. The image below shows a transaction categorised using detailed
categorisation.
Updated about 2 months ago