NEW! Reallocation Setup for Inventory View
Overview
Creating “ Reallocation Inventory View ”
- The first step is to create a Standard Inventory View. The standard view should be your currently used inventory view. Note that it is likely you have already completed Step 1, as this is the view that you currently use to close your books pre-allocation
- The next step is to create the Balance Only Inventory view. The balance only view is an inventory view you create. Its purpose is to obtain the balances of all your wallets on a wallet by wallet basis to establish the foundation for reallocation. It is important that this inventory view has NO negative balances otherwise it cannot be used.
- After creating both the views, Make sure to update those views before creating the Reallocation Inventory View” .
- For reallocation of the view, Please make sure all the Pre-Requisites (mentioned below) are fulfilled.
Pre-requisites before creating Reallocation inventory views :
- All transactions must be categorized and books closed up till the date you decide to reallocate.
- Your Standard and Balance Only views should both be updated after all transactions have been categorized.
- There should be no errors or negative balances in your standard inventory view.
- Ensure you have had a consultation with your tax or accounting lead / expert regarding your desired reallocation approach.
Steps to create Standard Inventory View :
Steps to create Standard Inventory View:
- Click “ create view ”
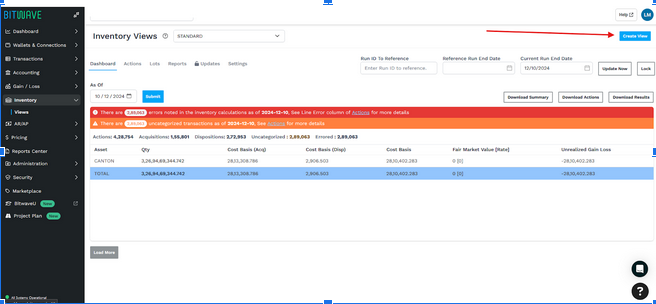
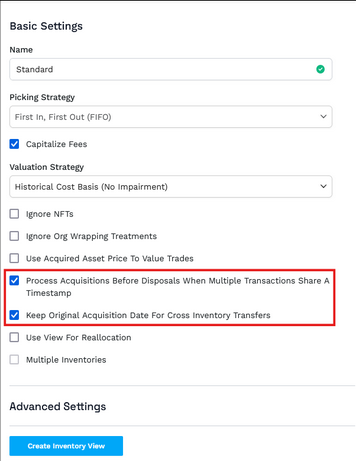
- Name the view and select the desired “Picking Strategy” and “Valuation Strategy” and hit “Create Inventory View”.
See additional informationhere regarding inventory views setup.
NOTE : While creating new inventory views, the options below in the red box should be checked.
Steps to create Balance Only Inventory :
Repeat the same process with some different instructions :
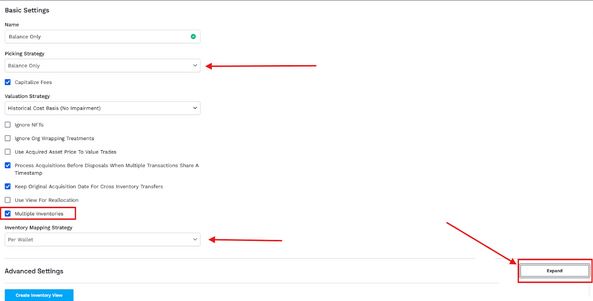
- Click on “Picking Strategy” and select “Balance Only”.
- Click on “ Expand ” and change the engine version to the latest version (v2.0 or higher).
- After you change the engine to a version that is v2.0 or higher, you will now be able to select multiple inventories, so click on “Multiple Inventories.”
- After selecting Multiple Inventories, click on “Inventory Mapping Strategy” and you must select the “Per Wallet” option.
Note that a user may also use our custom Inventory Groups feature for inventory management. For more information on how to subscribe to this feature, please reach out to your Bitwave representative.
NOTE that Valuation Strategy and all other options that are not mentioned above should match with the standard view.
- Confirm all the settings and hit “Create Inventory View”
After creating the Standard View and Balance-only View, please update both the views and let them update completely before creating the reallocation view.


Steps to create Reallocation Inventory :
After the Standard and Balance Only views are updated successfully, create the Reallocation Inventory View with the same process described above, but with the following modifications in selecting the options :
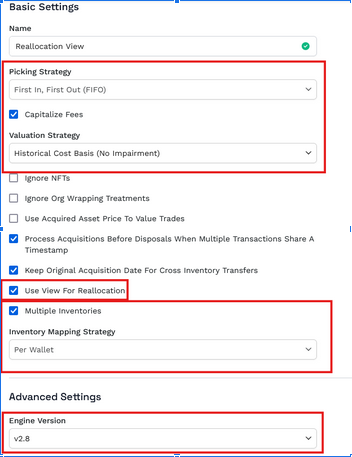
- Picking strategy and validation strategy should be same as your Standard inventory view
- Please select the same engine version as the Balance Only inventory view.
- Choose Multiple Inventories and select the same inventory mapping as Balance Only inventory view
- Also for the inventory mapping strategy, you can select either of the options (Per Wallet or Inventory Groups) depending on your preference.
- Select “ USE VIEW FOR REALLOCATION ”.
Please confirm all the selected options as shown in the screenshot below.
Running Reallocation Inventory View
- After creating all three views successfully, Click on your Reallocation Inventory View and go to the “Reallocation” menu at the top of the Inventory Views screen.
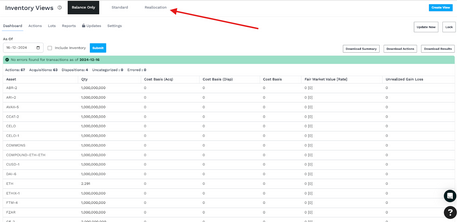
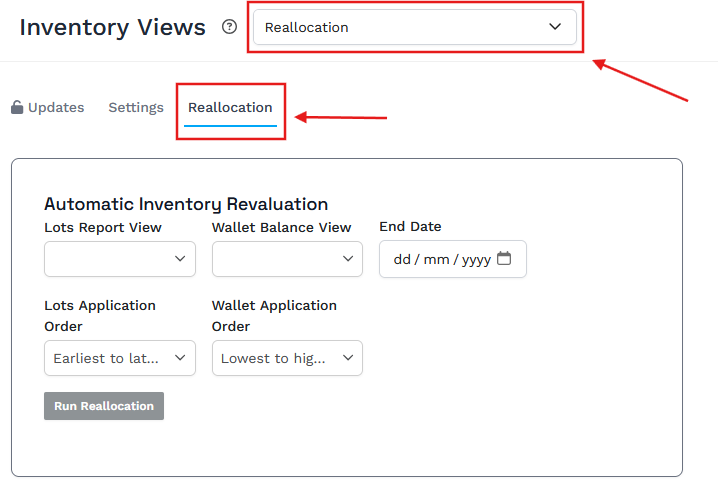
- Please select the following options as suggested below :
For “Lots Report View”, select “Standard View.”
For “Wallet Balance View”, select “Balance Only View.”
The End Date selected should be the last day before you want the Reallocation to occur. In most cases this date will be 12/31/2024. For example, if you are reallocating your inventory lots as of January, 1 2025, then the End Date that should be entered here is 12/31/2024.
For “Lot Application Order”, you can select the desired option “Earliest to Latest Acquired” or “Latest to Earliest Acquired ”
For “ Wallet Application Order ”, you can select the desired option “ Highest to Lowest Qty Balance” or “Lowest to Highest Qty Balance ”
- Go to the Updates Tab

- Fill out these boxes in Red (in screenshot)
The Reference Run ID is the run ID from the view you are using for your PRE-reallocation results. If your reallocation date was 12/31/24, you will put in the Reference Run ID from your pre-reallocation Inventory View and you will put 12/31/24 in the Reference Run End Date box. This will bring in the results from your old (pre reallocation) view through your cutoff date
Put whatever date you desire in Current Run End Date (I usually just use todays date so it updates everything)
- Click Update Now
Updated 5 months ago
